Pages

Showing posts with label DIY. Show all posts

Thursday

a backpack made of... a bank money bag / easy DIY

if you ask me, tiho is an absolute genious when it comes to making sth out of nothing. ages ago I was given an old, heavy-canvas (empty...) money bag. it got stuck somewhere among my other things utterly useless until tiho found it and made it into a backpack.
how? well, as far as I can recall, he used straps from an old bag that he wouldn't use anymore, added a pocket that he removed earlier from one of his shorts and simply added a heavy cord to tie the upper part and that was pretty much it:)
easy breezy.

147_1309

found the picture and couldn't resist to share it. thumbs up for the guy!

have a good day!
-oh

Monday

easy watch belt DIY

hey, hey!
I don't like watches - they are vicious little machines that instead of helping you to be on time, show how late you actually are :) but anyway, once, being in lisbon I found a watch that felt like mine: simple in form, but red with white polka dot pattern. it was cheap, a bit trashy and it made me wander if I can break the chain and start working on my punctuality. I bought it and I wore it for quite some time.
I found it in one of the boxes last summer – it needed a new battery and it was painfully obvious that it's time for a new belt. and here we go!

materials: scissors, measuring tape, strong (but not too thick!) fabric of a chosen colour/pattern, a magnet popper (or a hook and loop fastener), interfacing fabric, iron, sawing machine


12-001 step 1, 2: remove the old belt (it shouldn't be difficult, but be careful not to break any part). make sure you secure the “pins” that hold the belt, we're going to need them!


34-001 step 3: chose fabric for your belt
step 4: measurements: a/ measure the width of your old belt – the new one should be just as wide, b/ make sure that the popper you're going to use isn't too large/small for that width, c/ use a measuring tape to measure your wrist and decide how long your new belt should be. add about 5 mm from each side to close the belt. I wanted mine to fold around a wrist twice, so I've made it longer. you have the measurements of your belt? great, now multiply the width by 4 – you need to do it in order to fold the edges to the inside so that nothing unravels. it will also make your belt stronger.


56-001 step 5: now, cut the fabric and iron the interfacing (in the picture it's the white “inside” of the belt). to secure all the edges and come back to the original width of your belt (now it's 4 times as wide as it should be at the end) you have to fold it in half (length) and iron this fold (the interfacing should be inside). You have two “halves” now and each of them should be folded once more (the edge of each half should reach the line made by the first fold). it all sounds a little complicated but it's actually really easy, you can try with a piece of paper first!
step 6: your edges are “inside” the belt. you can take the sewing machine now and sew the belt on both sides and ends keeping the seem pretty close to the edges. TIP 1: before you start sewing, make sure how your popper should be attached – some of them must be attached before the sewing. a hook and loop fastener could also be a good idea here – you can saw/glue it after you've sawn the belt. TIP 2: it's best to start sawing with closing the ends of the belt: you should fold the belt about 5 mm to the inside and sew it.


78-001 step 7, 8, 9: the belt is ready and all you have to do now is to reattach it to your watch. my watch is attached at one third of belt's length, as the longer part will fold around my wrist twice.

taaadam, we're done!

IMGP0010
good luck!
-oh

Saturday

heart shaped elbow-patch DIY

hello! I have another lazy DIY tutorial for you today:) it's so easy that I feel kind of silly even calling it a tutorial, but anyway I wanted to show it to you. I decided to add patches not only to refresh my beloved old cardigan, but mainly because the wool got really thin on both elbows and it needed some support not to fall apart. I didn't want the patches to be focal points, so I used colours that naturally blended with the cardigan.
so, here we go!
materials: scissors, pins, thread & needle, piece of paper, marker and fabric that you'll gonna make your patch of. I decided to use felt and would recommend it for any sorts of sweaters (they are both made of wool, so it will look naturally), but any other fabric/material that doesn't thread on the edges will be good (for example a piece of leather, suede etc.)

Kolaże21 step 1: put your cardigan on and mark where the patches should be placed (it's best to do it while actually wearing it). then put it flat and make sure you've marked the patches on both sides on the same hight
step 2: prepare felt, thread, scissors and a piece of paper. draw a shape that you want your patch to be on a piece of paper and cut it
step 3: place the paper form on the right spot on your cardigan and make sure it's not too big/small. adjust if you have to
step 4, 5, 6, 7: use a marker and a paper form to transfer the right shape to a piece of felt. place the patches on your cardigan and pin them


Kolaże20
step 8, 9: start sawing! remember to keep it pretty close to the edge of your patch and be sure the seam is evenly following the edges.

we're done, enjoy! :)

IMGP0039

hugs,
-oh

easy purse makeover DIY

hello, hello! today I want to show you a purse that I've been wearing quite often lately.
I got it (or actually stole:)) from my mother, who bought it in a second hand shop - it looked all right, though - as for my taste - was a bit too dull and screamed for a tiny makeover...
this is how it used to look like originally:
easy purse makeover DIY

and this is how it looks like right now:) easy purse makeover DIY
I know that the combination of colours may seem a bit strange and not really fitted well, but I like it a lot. the purse itself is pretty simple and I wanted it to get wilder, so I decided that light violet will be just fine.

and this is how I did it (it's baby simple!):
materials - fine sandpaper, universal spray paint (I used some leftovers), paper tape
1 step - use the sandpaper to make the surface rough, otherwise the paint won't stick. and watch out - you don't want to make a hole!
2 step - use a paper tape to secure these parts of the purse that you don't want to paint
3 step - spray the paint carefully, most probably you'll need to cover it with two layers. just make sure you give the paint some time to get dry before second layer.
and just one little tip: when you paint with a spray paint, remember not to hold the can too close to the surface. a thick layer of paint won't look good!
easy? yes!

have a great weeken!
-oh

Tuesday

easy sweatshirt doily-application DIY

oh, and again I've managed to disappear from here for a little while. it wasn't planned, but all this fuss with moving and starting kind of a new life... well, I guess it just has to take time. I even missed the fact that autumn's here and it's not a baby autumn any more, but a real grown up and a bit gloomy lady.

I want to show you sth that I actually done last spring, but never had a chance to post here - an easy sweatshirt application DIY.
the idea was simple - I needed sth that would hide name of the brand (hate clothes with brands and logos all over) and because I was in a hurry, this had to be a quick action. and so I thought: how about some old doilies? :)

this is how it goes:

easy sweatshirt application DIY

1. put your sweatshirt flat
2. prepare all materials: doilies, scissors, pins, needle and thread same colour as the doilies


easy sweatshirt application DIY

3. place all doilies the way you want them to be attached
4. pin each doily
5.&  6. start sewing the doilies - it's best to start with the largest. sew them on the edges and procede to catch some stitches in the middle - it will prevent them from ruffling


easy sweatshirt application DIY
et voila;)

I've been wearing my sweatshirt for a few months now and there are no sad surprises - nothing's falling apart or ruffling even after quite a few encounters with a washing machine.
hope you'll like it:)

-oh

Saturday

learning to sew - an easy appliqué DIY

it was long time coming and finally happened: I sat at the sewing machine and pressed the foot control! yup, I learn to sew and I'm pretty excited about that;)
sewing was always one of the things that I really wanted to learn, but when I was small there was nobody to teach me and when I grow up I kind of got used to the fact that it's simply sth I don't know (silly, right?). and then I've met t. who could sew anything and my efforts (there were some trials...) seemed sensless. I thought I will never be able to sew like him, so why bother?
fortunatelly, I've shaken it off and finally sat at the machine. and you know what? it's been one hell of a ride:) there were some ups and downs, but in general there is only one thing I can say: I LOVE IT!

ok, that was a long introduction...
now, getting to the point, I guess the most important thing while learning to sew is to start with the right project. in my earlier endavors I used to be too ambitious, wanted to sew complicated things not really knowing how the machine works. you can imagine how frustrating and daunting it was. this time I thought of sth simple, sth doable for a sewing dummy: an appliqué.

there was a nice opportunity: my friends got a baby-girl some time ago and I really wanted to make sth for her, so first I wrote a tiny-tiny lullaby and then sat to work:
1. prepared stripes of frayless fabric in different colours and cut the words out. I've made sure that words standing next to each other are in different colours
2. took some colourfull fabric leftovers and cut rectangles that serve as background for the words. to make sure the fabric won't fray, I've ironed the edges inwards (tip: fabrics with small patterns make the best background)
3. for the final layer: cut four larger stripes of fabric (one for each line of the lullaby). they have to be wide enough to fit all the words and leave some extra for sewing the stripes together
4. now, the best part: sewing all the layers together, one by one! first I've attached all words to their backgrounds sewing not only on the edges but also between letters, so that the frayless fabric sticks better. it's a pretty good exercise for a sewing starter. then, when all of my words had their backgrounds sewn together I placed them in line on the final layer, pinned and started to sew. there should be some space below and above the words so that you could sew all the larger stripes together - this was the most difficult part for me as the stripes were almost 1,5 m long:)
5. the end: framing. I've cut four stripes of material - two of the appliqué's hight and two of its lenght, again ironed the edges inwards and simply sewn it to the appliqué's edges.
6. I wanted my appliqué to be able to hang, so I've also sewn four little hooks on the upper edge

et voila!

all in all, it's pretty easy to do it. there is a lot of cutting, true, but also a lot of basic sewing and this is a great way of learning the easiest things: how the stitches go, how does the machine work, how to use the foot control etc. t. was right when he told me to experiment with the machine's settings and simply not to be affraid: when sth goes wrong you can always try doing it again. and again;)

yay, sorry for making it all soooo long. have a great weekend!
-oh

an easy appliqué DIY an easy appliqué DIY an easy appliqué DIY

Sunday

a waterproof laptop backpack DIY

today I will boast a bit;)
I have been dreaming of a laptop backpack for a while - I'm tired of my old, dull laptop bag and of dragging the computer on one shoulder. it just doesn't seem healthy nor comfortable any more.

I wanted us to make sth simple, safe and practical, sth I could use every day, no matter the weather conditions. it's designed the way it fits all the basics: a computer, cords, an agenda and some files.

MATERIALS
the most important thing was to get a waterproof fabric - we were lucky to find a second hand bag with large yellow panels that we used as the external layer of the backpack. it's a half-transparent, waterproof plastic strenghten with a thread-net inside. the stripped fabric underneath and the red cotton lining are both second hand and so is the belt. actually, the belt makes a funny story - we were looking for a strong, wide, but not too hard belt or a fabric tape and in the end we've found a karate belt that felt simply perfect! I liked the belt so much that I decided we'll keep the original 'kamosu' label.
sewing any laptop bag you'll also need to get a sponge-a-like material to make it safe enough for a computer (tip: you may reuse an old karrimat).

SEWING/SHAPE
I wanted the backpack to look flat, without losing space, so we decided to cut all the major pieces of fabric rhombus-shape - with the down corners pulled to the inside it makes the front look rectangular and you get some extra space on the botton (depth).
inside there is also a padded 'sleeve' for the computer and a pocket with a zipper.
the lower end of the belt is sewn into the backpack's seam to make it stronger.
if you have enough materials, you should go for a longer folding part - our is maybe a bit too short, but it's all we could do with what we had;)

all in all, I couldn't be happier with how the backpack turn out - it fits great, looks good and cost us close to nothing! hope you'll like it too.
sorry for the lack of pictures of work in progress, but this time we were just too lazy to take them (admit) ;) besides, this yellow plastic doesn't photograph easy...

oh, and I officially say 'thank you' to my mom for taking some of the pictures below!


take care!
-oh


a waterproof laptop backpack DIY a waterproof laptop backpack DIY a waterproof laptop backpack DIY a waterproof laptop backpack DIY a waterproof laptop backpack DIY

Thursday

biking all the way!

when t. and I came to my hometown, where we've spent this summer, there was one thing we were sure we wanted to do - bike a lot. problem: there was only one bike working and available - my old mountain bike that I honestly never really grow to like. the second one was still to emerge...
in the garage - my father's hoarding sanctuary - we've found a beautiful, but complitely neglected, rusty violet bike. it was a love from the first sight and I can only wish I had a picture of it before we started bringing it back to life. it is an old fisher basic and nobody's sure how it actually end up in the garage. I say it's fate;)
it took us a few days to take it to pieces, clean, polish, grease and paint every part, but it was defenitely worth it! the bike moves like a dream now and during the past two months I had absolutely no problem with it.

all in all, it's my absolutely beloved reanimation project that we've ever made. and all it cost us were two bottles of spray paint - everything else (grease, sand paper etc.) we were lucky to borrow from my father&brother.

take care, autumn is coming!
-oh


IMGP00281 IMGP0011 IMGP0003 IMGP0028 IMGP00011


and the only 'early' picture of the bike:

IMGP0002

a statement t-shirt DIY

for the past months I've been having a rather peculiar living situation that I call 'being kind of homeless'. of course, I don't live on the street, I have some friendly beds and couches here and there and I'm incredibly grateful for that, but there's no place I could come to and say 'ufff, I'm finally home!'. the longer it lasts the more tiring it gets and I'm running out of ideas of how to make it sound less frustrating. nevertheless, trying to fight the frustration I thought of a little DIY that I want to share with you today... you don’t have to be an experienced crafter or buy any fancy supplies to do it, so it’s pretty much available for anyone with a few minutes of spare time:)

1 & 2. supplies you’ll need: t-shirt, interfacing textile, scissors, ruler, a pen that easily writes on fabric, iron, ironing board
tip: most probably you’ll find either black or white interfacing fabric, so before you buy one, make sure which t-shirt you want to use – if it’s light colour, maybe it will be a better idea to buy dark interfacing (and the other way round) to make it more visible.
you may want to get a plain t-shirt for this DIY, though I think the one with print is even better. I like a little chaos that it makes:)

Untitled
3. cut a rectangle of an interfacing textile of size appropriate for your t-shirt
4. on the piece of interfacing write a word of your choice. I did it by hand, but if you find it difficult, you may use stencils instead. if you’re ambitious and want to write on the back of your textile so that no pen lines would be visible on the front, remember that the words will be converted
5. cut out the letters carefully. for curvings you may need some small and sharp scissors (I used nail scissors)
6. place your interfacing on the t-shirt to see how it looks. make the last changes

Untitled
tip: when it comes to letters with ‘bellies’ like o, p, b, d etc. you may leave them ‘empty’ if you want to (left) or simply place the the lacking part inside (right), just remember not to throw it away while cutting!

Untitled/>7, 8/
this is another (much easier:)) way to make the letters. just cut stripes of your interfacing, lay them on your t-shirt and cut appropriate pieces forming letters
9/
place everything on your t-shirt and see how it looks. if it’s ok, it’s time for ironing!
Untitled
10. place the t-shirt on an ironing board, iron it, put the rectangle and make sure everything’s even and right
11. place a piece of cotton fabric on the t-shirt and iron the interfacing through it. don’t do the ironing directly on the interfacing as you may burn it. if you want to be sure that your iron isn’t too hot, make a trial run on another piece of fabric
12. do the same thing with other letters. it’s always better to divide this work into parts instead of ironing the whole thing at once. this way you’ll have a better control of how it looks
13. take off the cotton fabric and see how the interfacing sticks to the t-shirt. you may need to iron some parts for a bit longer

Untitled

ha, now you’re ready to go!:)
Untitled
if you're handy with a sewing machine, you may try to sew the edges of the interfacing just to make sure it will stick better. I'm too lazy for that... :)

cheers!
-oh

Saturday

lucky lucky garbage discoveries

do we like garbage? oh, yes, yes, we do!
no wonder than that when a few days ago I went out and saw an old couple leaving something next to a conteiner on our street the radar started working;) I found a shoe box full of old postcards from all over europe sent in the 60s and early 70s. adressed to a grandmother. absolutely gorgeous and well kept! many black and white pictures, some colour filtered – like the one on the pic beneath.
I love postcards and it’s so sad that so few people these days actually send them - and if you don’t send your postcards because you can never find your way to the post office to get some stamps, there’s the tip: when you send a card from a big europen city just write what you want to write and put it into a post box. it will find its way even without a stamp! my lousy-budget journeys made me check on it and I can tell there is 100% effectiveness until now. this is how the post guys exchange reliable people for faster machines…
but pssst, it’s ain’t legal to say it loud…
a little confession: I was always into second hand things, but the first time I got really fascinated with garbage was a few years ago when we hitch-hiked to spain. the old red leather suitcase next to a dustbin in barcelona was really beautiful and easy to resotore. unfortunatelly, also too big and uncomfortable to drag it through the whole europe for another couple of weeks. happily I managed to collect some of the lego stuff – a lego cook, lego tree, a lego street and a lego car. I dreamt about it when I was a child, but it was too expensive at that time. then I got it for free;)
and now some good news - the bombona sewer is coming back from his exams-exile! congratulations, congratulations! today we've celebrated it with an exquisite choco-banana cake;) shall put a recipe here soon - it's really worth it!

and some announcement for the gdansk -today (saturday) our bags are HERE.

cheers!
-savez


IMGP0029-1

IMGP0022-1


the last thing. before christmas I used some of the postcards we found on a flea market to make season cards – I really enjoyed the idea of changing a postcard sent from holidays about 40 years ago into a christmas card that I could use now. objects travelling in time and space - isn't this great:)
IMGP0001

Tuesday

converse/sneakers personalised - DIY

when I got these old convere sneakers they were already a bit worn out adults. we didn’t manage to grow old together, to build a proper relationship. and so I didn’t like them as much as I like likeing my shoes. we were two shy students coincidentally meeting in a huge empty hall not really knowing whether to say 'hello' or get back to where we were 5 minutes ago.
‘a little re-work has to be done’ I thougt. and did.
now I can say they are mine, we're friends and it really sounds to me like another season without spending money on new shoes got officially secured!

and here's what I did and how I did it.
supplies: new shoe laces in a chosen colour, waterproof marker suitable for different surfaces, jets
step 1: first I've got my sneakers fresh and clean, I've glued what there was to be glued, sewn what needed to be sewn:)
step 2: I've chosen a section that I decided would be decorated with jets. attached all my jets.
step 3: I've used a marker to colour rings through which the laces go and also coloured some of the jets. I also decided to add some colour over the black stripe on the side of the sole (you can see in the last picture - there's an additional blue stripe over the black one).
step 4: change the old laces and you're done! you can go for a walk now;)

the truth is, I love getting old shoes/sneakers, because I feel absolutely no pressure changing the way they look. I guess the more you pay for stuff, the less freedom you have experimenting with them.

cheers!
-savez
patike

IMGP0015-1

Friday

back to paperland!

oh erased habits and abandoned pleasures! we sometimes promise ourselves we shall come back to them one day. the legendary „one day” of course never happens, as there are too many new challenges, habits, enterteinments to even try to make it happen.
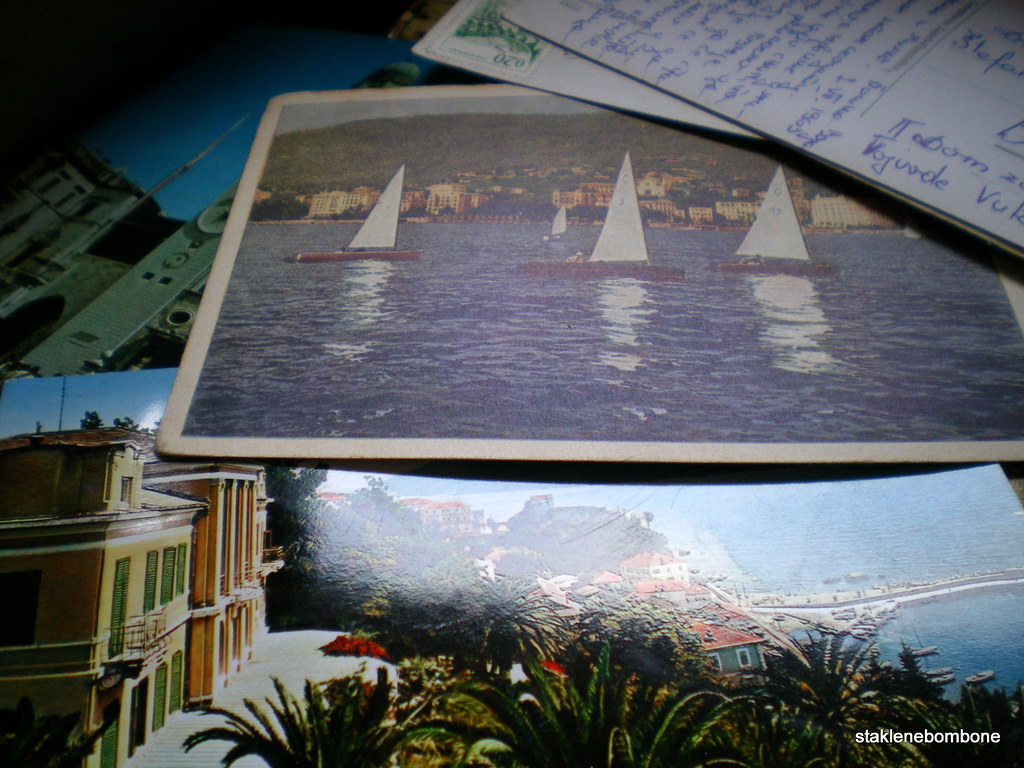
some stopped doing sports, some reading books, others don’t send/collect holiday postcards or learn new languages any more. or write letters…
packing for any lonely journey I took used to finish with copleting some envelopes and sheets of paper in order to be able to let my obsessive passion flourish: writing letters while sipping coffees in local cafes, sitting on park benches, waiting long hours on train stations and airports. stealling pens from shops and post offices, secretly tearing pages from hostel guest books when left short of paper.
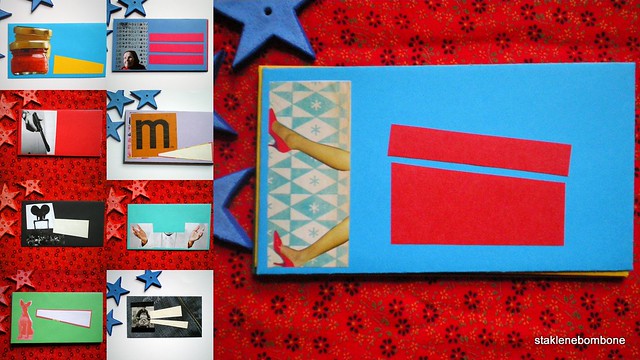
the grey pack-paper envelopes is what I liked most until I found an old-style triangle-back envelope, opened it and made it my template of beloved shape. bought large sheets of cards in EKIERKA paper shop nearby and started a little manufacture. my life-long habit of collecting parts of newspapers, magazines, leaflets, colourful papers was of use and the colourful garbage hit the envelopes’ front!
and when I moved far from the spring of cheap ekierka-cards I started using old callendars, posters, folders as a base – anything that was large and tough enough to make it work well.
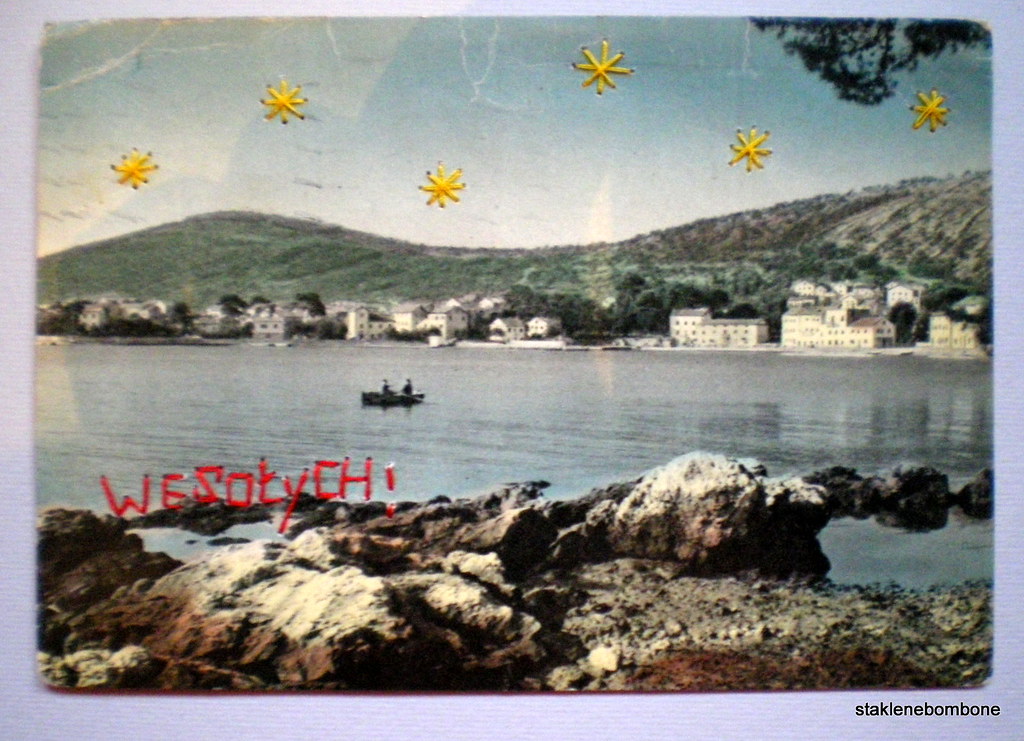
some people watch tv, some exercise, some eat, some sleep and I used to visit paperland when I felt bit brainwashed. my nonsense collection of hundreds of stars cut from newspapers is a living proof of how brainwashed I could sometimes get… :)
another step after coming back to making envelops should be writing letters. hopefully!
-oh
ps. neverending winter is most probably the best time to make the legendary "one day" happen!


envelopes