
it was long time coming and finally happened: I sat at the sewing machine and pressed the foot control! yup, I learn to sew and I'm pretty excited about that;)
sewing was always one of the things that I really wanted to learn, but when I was small there was nobody to teach me and when I grow up I kind of got used to the fact that it's simply sth I don't know (silly, right?). and then I've met t. who could sew anything and my efforts (there were some trials...) seemed sensless. I thought I will never be able to sew like him, so why bother?
fortunatelly, I've shaken it off and finally sat at the machine. and you know what? it's been one hell of a ride:) there were some ups and downs, but in general there is only one thing I can say: I LOVE IT!
ok, that was a long introduction...
now, getting to the point, I guess the most important thing while learning to sew is to start with the right project. in my earlier endavors I used to be too ambitious, wanted to sew complicated things not really knowing how the machine works. you can imagine how frustrating and daunting it was. this time I thought of sth simple, sth doable for a sewing dummy: an appliqué.
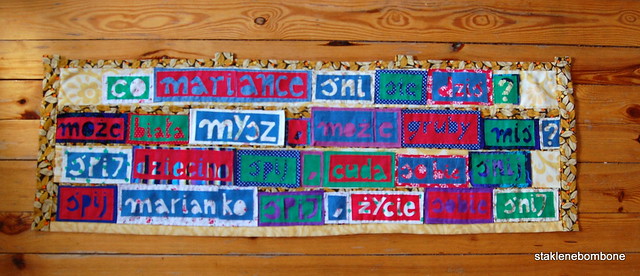
there was a nice opportunity: my friends got a baby-girl some time ago and I really wanted to make sth for her, so first I wrote a tiny-tiny lullaby and then sat to work:
1. prepared stripes of frayless fabric in different colours and cut the words out. I've made sure that words standing next to each other are in different colours
2. took some colourfull fabric leftovers and cut rectangles that serve as background for the words. to make sure the fabric won't fray, I've ironed the edges inwards (tip: fabrics with small patterns make the best background)
3. for the final layer: cut four larger stripes of fabric (one for each line of the lullaby). they have to be wide enough to fit all the words and leave some extra for sewing the stripes together
4. now, the best part: sewing all the layers together, one by one! first I've attached all words to their backgrounds sewing not only on the edges but also between letters, so that the frayless fabric sticks better. it's a pretty good exercise for a sewing starter. then, when all of my words had their backgrounds sewn together I placed them in line on the final layer, pinned and started to sew. there should be some space below and above the words so that you could sew all the larger stripes together - this was the most difficult part for me as the stripes were almost 1,5 m long:)
5. the end: framing. I've cut four stripes of material - two of the appliqué's hight and two of its lenght, again ironed the edges inwards and simply sewn it to the appliqué's edges.
6. I wanted my appliqué to be able to hang, so I've also sewn four little hooks on the upper edge
et voila!
all in all, it's pretty easy to do it. there is a lot of cutting, true, but also a lot of basic sewing and this is a great way of learning the easiest things: how the stitches go, how does the machine work, how to use the foot control etc. t. was right when he told me to experiment with the machine's settings and simply not to be affraid: when sth goes wrong you can always try doing it again. and again;)
yay, sorry for making it all soooo long. have a great weekend!
-oh
sewing was always one of the things that I really wanted to learn, but when I was small there was nobody to teach me and when I grow up I kind of got used to the fact that it's simply sth I don't know (silly, right?). and then I've met t. who could sew anything and my efforts (there were some trials...) seemed sensless. I thought I will never be able to sew like him, so why bother?
fortunatelly, I've shaken it off and finally sat at the machine. and you know what? it's been one hell of a ride:) there were some ups and downs, but in general there is only one thing I can say: I LOVE IT!
ok, that was a long introduction...
now, getting to the point, I guess the most important thing while learning to sew is to start with the right project. in my earlier endavors I used to be too ambitious, wanted to sew complicated things not really knowing how the machine works. you can imagine how frustrating and daunting it was. this time I thought of sth simple, sth doable for a sewing dummy: an appliqué.
there was a nice opportunity: my friends got a baby-girl some time ago and I really wanted to make sth for her, so first I wrote a tiny-tiny lullaby and then sat to work:
1. prepared stripes of frayless fabric in different colours and cut the words out. I've made sure that words standing next to each other are in different colours
2. took some colourfull fabric leftovers and cut rectangles that serve as background for the words. to make sure the fabric won't fray, I've ironed the edges inwards (tip: fabrics with small patterns make the best background)
3. for the final layer: cut four larger stripes of fabric (one for each line of the lullaby). they have to be wide enough to fit all the words and leave some extra for sewing the stripes together
4. now, the best part: sewing all the layers together, one by one! first I've attached all words to their backgrounds sewing not only on the edges but also between letters, so that the frayless fabric sticks better. it's a pretty good exercise for a sewing starter. then, when all of my words had their backgrounds sewn together I placed them in line on the final layer, pinned and started to sew. there should be some space below and above the words so that you could sew all the larger stripes together - this was the most difficult part for me as the stripes were almost 1,5 m long:)
5. the end: framing. I've cut four stripes of material - two of the appliqué's hight and two of its lenght, again ironed the edges inwards and simply sewn it to the appliqué's edges.
6. I wanted my appliqué to be able to hang, so I've also sewn four little hooks on the upper edge
et voila!
all in all, it's pretty easy to do it. there is a lot of cutting, true, but also a lot of basic sewing and this is a great way of learning the easiest things: how the stitches go, how does the machine work, how to use the foot control etc. t. was right when he told me to experiment with the machine's settings and simply not to be affraid: when sth goes wrong you can always try doing it again. and again;)
yay, sorry for making it all soooo long. have a great weekend!
-oh
2 comments:
Fenomenalno je ispalo,vidi se da je trebalo truda da se izvede:D
hvala! i da, jeste bilo tesko, ali nadam se, da sledeci put kad sednem za masinom bicu barem jedan korak napred;)
Post a Comment