Pages

Thursday

a backpack made of... a bank money bag / easy DIY

if you ask me, tiho is an absolute genious when it comes to making sth out of nothing. ages ago I was given an old, heavy-canvas (empty...) money bag. it got stuck somewhere among my other things utterly useless until tiho found it and made it into a backpack.
how? well, as far as I can recall, he used straps from an old bag that he wouldn't use anymore, added a pocket that he removed earlier from one of his shorts and simply added a heavy cord to tie the upper part and that was pretty much it:)
easy breezy.

147_1309

found the picture and couldn't resist to share it. thumbs up for the guy!

have a good day!
-oh

Tuesday

easy way of making waisted dress fit a shorter person [tutorial]

if you ask me, being short brings many adventages and I never had any real or mental problem with it:) when you're 158 cm you can comfortably squeeze yourself into whatever bus/plane/train seat which is great during long journeys. besides, being petite makes people instinctively more sensitive about you - I bet the great desmond morris would have a lot to say about that.

HOWEVER, it's pretty obvious that being shorter than average (just as being taller/with wider or narrower hips/smaller or larger bust etc.) may cause problems when it comes to clothes that are designed to fit „average” measurements. for me it very often means that when I try a dress that is supposed to be fitted in waist, it will simply have waist where I have hips and hips where I have thighs. a disastrous look, as you can imagine:) I want to show you a very simple way of rectifying that problem.

NOTE: if you're learning to sew, it's a great way of exercising your skills - it's a very simple, yet practical test.

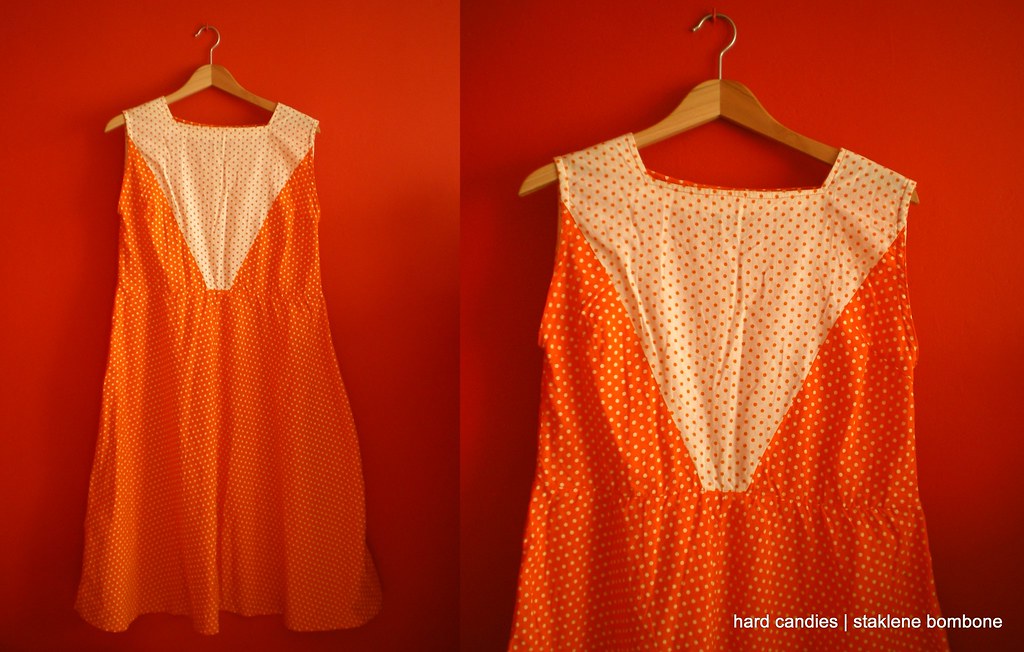
materials: all you'll need is basic sewing equipment (pins, scissors, measuring tape, sewing machine) and a waisted dress. I used a summer dress I found long time ago on a flea market. it's obviously too large and too „high” for me – the skirt part should start just beneath my waist and yet it hangs low, somewhere on my hips.
remebmer to take into concideration that a finished dress will be shorter than it's right now.


0408

here goes a very brief description of what my standard procedure in such circumstances is:

IMGP0061
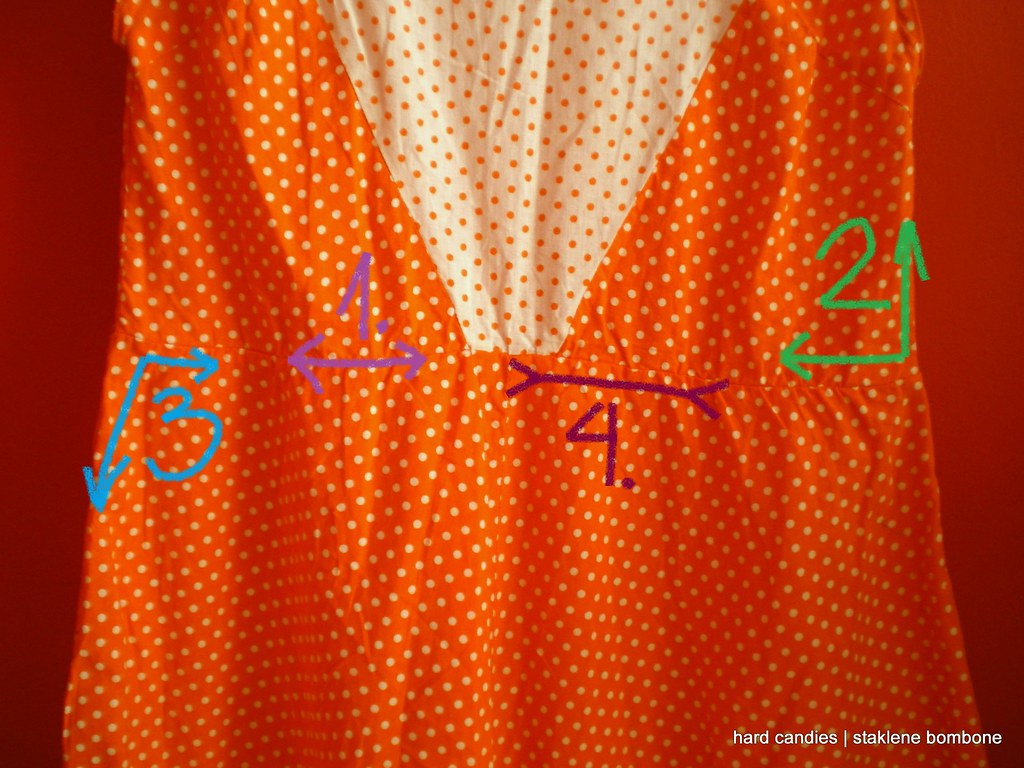
1.
unstitch the part with the skirt – you'll have two seperate parts now: a „skirt” and a „blouse”. Let's start with the second one.
2. take your measurement: measure how many cm there are from your arm to waist – that's going to be the lenght of the blouse (remember to leave it ca 1 cm longer – you'll need it to sew the two parts together). additionally if the dress is too large, measure your bust and waist – that's going to be the width of the upper and lower part of the blouse. Remember to turn it inside out, mark the measurements and simply narrow it. Try in on – if it's ok, you're done with this part, if something's too loose/tight/long, you'll need to unstitch it and do it again. a remark: if you want the blouse-part to be really fitted and the fabric doesn't stretch, you may need to sew in a zipper on the side/back. The dress from the photo was meant to stay a bit loose, so this time I didn't bother myself with a zipper as I can smoothly put it on through my head.
3. now, let's get to the skirt – if you want to have a plain dress, you will have to make sure that the upper part of the skirt is of the same width as the lower part of the blouse. that means, that you'll probably have to narrow the skirt a bit. of course, you may as well go for some ruffles/folds in the waist – in that case, don't narrow the skirt, just pin it to the blouse the way you fancy and sew it together.
4.
last part – turn both parts inside out, pin them together and simply sew it together. you're done.

img

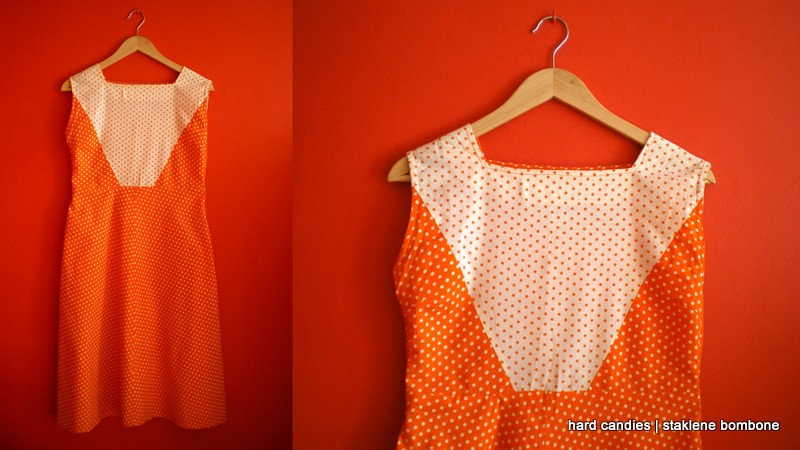
this is what I often do with my dresses and I find it the best and easiest way to make them fit well. there's no philosophy behind it and you don't have to be extremly skilled with a sewing machine (I defenitely am not;)).

cheers!
-oh

Monday

easy watch belt DIY

hey, hey!
I don't like watches - they are vicious little machines that instead of helping you to be on time, show how late you actually are :) but anyway, once, being in lisbon I found a watch that felt like mine: simple in form, but red with white polka dot pattern. it was cheap, a bit trashy and it made me wander if I can break the chain and start working on my punctuality. I bought it and I wore it for quite some time.
I found it in one of the boxes last summer – it needed a new battery and it was painfully obvious that it's time for a new belt. and here we go!

materials: scissors, measuring tape, strong (but not too thick!) fabric of a chosen colour/pattern, a magnet popper (or a hook and loop fastener), interfacing fabric, iron, sawing machine


12-001 step 1, 2: remove the old belt (it shouldn't be difficult, but be careful not to break any part). make sure you secure the “pins” that hold the belt, we're going to need them!


34-001 step 3: chose fabric for your belt
step 4: measurements: a/ measure the width of your old belt – the new one should be just as wide, b/ make sure that the popper you're going to use isn't too large/small for that width, c/ use a measuring tape to measure your wrist and decide how long your new belt should be. add about 5 mm from each side to close the belt. I wanted mine to fold around a wrist twice, so I've made it longer. you have the measurements of your belt? great, now multiply the width by 4 – you need to do it in order to fold the edges to the inside so that nothing unravels. it will also make your belt stronger.


56-001 step 5: now, cut the fabric and iron the interfacing (in the picture it's the white “inside” of the belt). to secure all the edges and come back to the original width of your belt (now it's 4 times as wide as it should be at the end) you have to fold it in half (length) and iron this fold (the interfacing should be inside). You have two “halves” now and each of them should be folded once more (the edge of each half should reach the line made by the first fold). it all sounds a little complicated but it's actually really easy, you can try with a piece of paper first!
step 6: your edges are “inside” the belt. you can take the sewing machine now and sew the belt on both sides and ends keeping the seem pretty close to the edges. TIP 1: before you start sewing, make sure how your popper should be attached – some of them must be attached before the sewing. a hook and loop fastener could also be a good idea here – you can saw/glue it after you've sawn the belt. TIP 2: it's best to start sawing with closing the ends of the belt: you should fold the belt about 5 mm to the inside and sew it.


78-001 step 7, 8, 9: the belt is ready and all you have to do now is to reattach it to your watch. my watch is attached at one third of belt's length, as the longer part will fold around my wrist twice.

taaadam, we're done!

IMGP0010
good luck!
-oh

Saturday

heart shaped elbow-patch DIY

hello! I have another lazy DIY tutorial for you today:) it's so easy that I feel kind of silly even calling it a tutorial, but anyway I wanted to show it to you. I decided to add patches not only to refresh my beloved old cardigan, but mainly because the wool got really thin on both elbows and it needed some support not to fall apart. I didn't want the patches to be focal points, so I used colours that naturally blended with the cardigan.
so, here we go!
materials: scissors, pins, thread & needle, piece of paper, marker and fabric that you'll gonna make your patch of. I decided to use felt and would recommend it for any sorts of sweaters (they are both made of wool, so it will look naturally), but any other fabric/material that doesn't thread on the edges will be good (for example a piece of leather, suede etc.)

Kolaże21 step 1: put your cardigan on and mark where the patches should be placed (it's best to do it while actually wearing it). then put it flat and make sure you've marked the patches on both sides on the same hight
step 2: prepare felt, thread, scissors and a piece of paper. draw a shape that you want your patch to be on a piece of paper and cut it
step 3: place the paper form on the right spot on your cardigan and make sure it's not too big/small. adjust if you have to
step 4, 5, 6, 7: use a marker and a paper form to transfer the right shape to a piece of felt. place the patches on your cardigan and pin them


Kolaże20
step 8, 9: start sawing! remember to keep it pretty close to the edge of your patch and be sure the seam is evenly following the edges.

we're done, enjoy! :)

IMGP0039

hugs,
-oh